Hello & Good Morning...
Today I will be sharing a cute little Mini Album with a beautiful binding technique. I call this mini album ‘A Starry Stitch Mini’. This project is made for
Itsy Bitsy DT inspiration...
The look of the spine is totally inspired from an International crafter
Stacy Koo of
Doraecyscraps. You can check out her creations
here.
So lets get started...
Front & Back Cover and Spine:
I have cut the chipboards to the desired size and then painted all the 3 pieces with white gesso on both the sides & edges and let it air dry for few hours. Another way is to cover the chipboards with white cardstock.
Chipboard Sizes:
For the front & back cover – 5” x 6”
For the spine – 2 1/2” x 6”
Mat the covers & spine with pattern papers. I have used Love Notes Paper Pad by We R Memory Keepers. It is a wonderful paper collection, perfect for expressing love & care.
Pattern Paper Sizes:
For the front & back cover – 4 7/8” x 5 7/8” (inside & Outside)
For the spine - 2 1/2” x 6” (only Outside)
I have used the Scrapbooking glue to adhere the PP to the Spine so its easy to pierce holes through it.
To give a subtle look to my cover I have further mat it using Vellum. Vellum being translucent, it is always tricky to adhere it as the adhesive is visible from the front. So the best way out is to first embellish it and then glue it by hiding the adhesive behind the embellishments. The embellishments I have used are shaped chipboard, resin frame, butterfly from the handmade flowers pack & pearls.
Chipboard Trick: The floral branches on the cover have been created using a single pack of shaped chipboard. This is the trick. Firstly I trimmed out the branches from the tree. Then soaked each piece for about 15-20 seconds i water and immediately dried it on a paper towel. Then while the chipboard still wet, peel the layers carefully without breaking it. Here I have peeled it into 3 layers. Lastly keep it aside for drying. You can also heat dry it to speed up the process.
Once dry, apply gesso & then paint the pieces with acrylic colours.
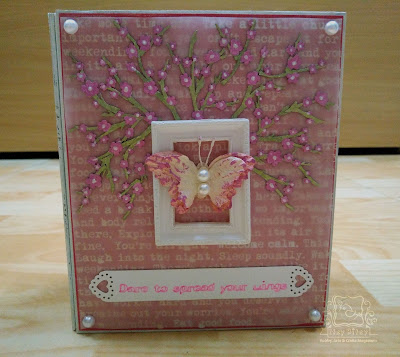 |
| Front Cover |
Binding:
A binding is the most integral part of any mini album. For this album I have used a stitching technique to bind all the pages. Stacy Koo calls this a Double Star Stitch.
Once the spine chipboard was ready after sticking the PP, I pierced holes using the piercing tool from the Deluxe Paper Crafting Tool Box.
For the hinges I have used white CS. Size: 2 1/2” x 6” Score @ 1” & 1 1/2”. Both the sides of the hinge was punched using a border punch. We need 5 such hinges.
For binding i have used American Craft Hemp Twine and a Needle. I started the binding from the last hole in the middle column. Holding the hinge behind the spine and matching the holes, pass the twine throught the hole. Then follow the diagram & instructions given below. Keep attaching the hinge from behind when u pass through a hole in the respective column.
Pages:
For the pages I have used White cardstock. Size: 4 7/8” x 6”. Mat the pages with pattern papers from Love Notes Paper Pad by We R Memory Keepers. We need 4 such pages.
Once the pages are ready, attach them between two hinges.
To embellish the pages, I have cut two frames out of the white CS, drew stitched border using a red pen and adhered them using double sided foam tape. The bottom frame has the top side open to slide a photo in it. Topped it with a flower from the Itsy Bitsy – Little Birdie Mini Embellishments Pack. The Inspirational quotes were printed on the white CS and then to strips. The American Craft Premium ‘XOXO’ ribbon was given stiffness by attaching a strip of CS behind.
The Quote wheel on the inside of the covers are again print & cut and the layers with CS, Pattern Paper & flowers.
Finally the pages look beautiful...
Supplies Used:
Hope the tutorial will be helpful. Trust me you’ll enjoy this binding as much as I did. Would love to see your version... Thanks for all the patience while reading through this super long post. Do leave some lovely comments...
Happy Binding!!!
Love
Gopi