So let's get started...
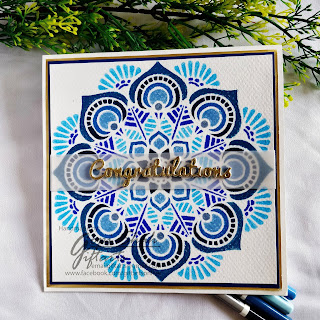
This first card of mine was actually a trial to this technique on a 5.5 x 5.5 inches Canson Mi-Teintes Paper (bought from a local artist shop) and trust me it came out so well that i got carried away and made 3 more.
For this card I positioned the Craftreat Mandala stencil on the base paper and started colouring in the openings using my Prismacolor Premier Pencils. I laid the colour heavily to fill in well as this base paper is a textured one.
For the sentiment I have gold heat embossed the word Congratulations and layered it with 3 other pcs to give it some dimension. Then I have used a 1 inch vellum sheet strip as a background to the sentiment and attached it to the center of the card. Finally Layered the coloured sheet with a Navy blue & Golden cardstock and finished it by adhering it to a 6 x 6 inches white no card.
I'm entering this card into following Challeges:
1.
Paru's Card Making Challenges
This is an awesome card making challenge blog owned & managed by an amazing indian crafter Paru Mahtani. She makes some really awesome cards all round the year keeping in mind the upcoming occasions/themes.
2.
The Twisted Challenges
According to the challenge theme this month, My card is made for general celebration using many shades of Blue.
3.
Cute Card Thursday Challenge #548 - Monochrome
4.
Pile it on Challenges #146 - Think Big and/or One Layer card
I have used a big mandala to make my card.
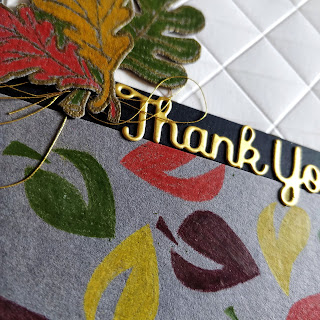
Lets move on to the next card. I made this card keeping the Fall / Autumn theme in mind. Here I have used a local inexpensive leaf stencil on a 5 x 5 inches grey coloured Cardstock. Positioning the stencil on the cardstock I started colouring in the openings using my another pride possession Steadtler Karat Acquarell Colour Pencils.
For the sentiment this time I have die cut the words Thank You using golden cardstock. To add a little dimension to the card I have used 2 elements:
1. Gold heat embossed leaves using the Itsy Bitsy Leaves clear stamp on the same grey cardstock, coloured and fussy cut them
2. White cardstock dry embossed using WRMK Geometric Next Level embossing folder.
For assembling I have slant cut the grey and white cardstock and stuck a black cardstock strip to a 6 x 5 white no card. Finally embellished the card with the leaves, sentiment and golden thread.
I'm entering this card into following Challenges:
1.
Just Us Girls Challenge #459 (I have used colours)
The third card is made on a 4.5 x 4.5 inches dark purple cardstock. Here a different process is used. After positioning the stencil (this too local inexpensive one) on the cardstock, using a finger dauber I have dabbed Hero Arts Unicorn White pigment ink through the openings of the stencil. Dry the ink using a heat gun. Then I started colouring on the white area using Steadtler Karat Acquarell Colour Pencils. The base white colour enhances the pencil colour on the top and make it look vibrant.
To assemble the card I have used a Violet cardstock and a 4.75 x 4.75 inches white no card. The sentiment is from MFT Because You stamp set. The word because is die cut using the coordinating die and layers 4 times and the sentiment strips are stamped and heat embossed using black embossing powder. Finallt embellished the card with few tiny heart die cuts.
The last card is done on a 5 x 4 inches kraft cardstock. Positioning the stencil (received as a gift from a very dear crafter friend Neha Bhatt) on the cardstock, I coloured through the openings using again the Steadtler colour pencils. I love rainbows and so the last card had to be rainbow coloured.
The hello sentiment is die cut and layered 4 times. Lastly the coloured piece is adhered to a 5.25 x 4.25 inches white no card.
I hope you enjoyed this post and was inspired too...
Love Gopi


